
 The matching to-do list uses picture, symbol, color, or word cues to organize the student who does not independently decipher written cues. The matching to-do list can be very effective, as it takes advantage of the visual skills of individuals by emphasizing ‘matching’ within the to-do list.
A matching to-do list consists of a left to right or top to bottom strip on which there are a set of symbols. Each task is represented by a different symbol. For some individuals, a to-do list may use a picture, letter, number, color, shape, or word that is matched with a corresponding picture, letter, number, color, shape or word on the bin, container or tray.
Corresponding: In most cases, the two images are identical. Thus, the student is matching to an identical image. However, in some cases, it might be appropriate to use two images that are not identical, but are matched based on a certain visual or thematic quality (e.g. Harry Potter goes with wizard hat). You must be sure that the student understands how these images are paired if you use non-identical images. You create this matching to do list and select the particular images based on the learning needs and interests of the student.
 These are the general steps to devising and implementing a matching to-do list:
- Assess what the student is interested in and decide which interest to incorporate into the to-do list. For example, if the student is interested in anime characters, then use images of anime characters for the matching cues.
- Print out images of interests and attach to bins or containers, as well as on the to-do list itself.
- The student will look to his list, see which image is first, and find the corresponding bin/container and complete that task.
- The student will put that task in the finished area.
- The student will then look to the work system list, see the second image, find the corresponding task, and complete that task.
- The student will continue until all tasks are complete. Then, he will look to the end of the to-do list to see what comes next.
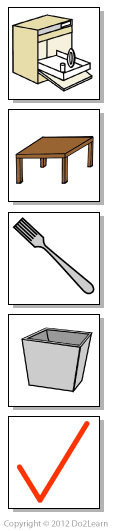
For example, a picture-based matching system may include a picture of a dish washer representing unloading the dishwasher, a picture of a table representing wiping down the tables, a picture of silverware representing rolling the silverware in cloth napkins, and a picture of a trash representing taking out the trash. The student matches the picture from the to-do list to a matching picture near the corresponding task (i.e., the dishwasher, the trash can, or the silverware station in a restaurant).
Once the task is completed, the student then takes the next card from the top of the strip (his to-do list) and matches it to another task. He uses the card and completes the next task. He can see the progression of the work. He can see that at the bottom of the to-do list is a card representing a favorite activity (computer time, break activity, etc.) or a ‘check schedule’ card (if he does not need specific and immediate reinforcement for working on this to-do list). When he finishes the tasks on the to-do list, he takes the last card and uses it to transition to ‘what comes next?’
Why use a matching to-do list?
 The matching to-do list takes advantage of the strong visual perceptual skills of individuals . The instructor may use pictures, icons, colors, shapes, letters, or numbers for the matching system. The instructor should consider symbols that will engage the student’s attention and support focus on the activities to be completed. Over time, the instructor should move the matching system to one more likely to be found in vocational situations. For instance, letter and number systems are both more community-friendly and more age appropriate for adults. Systems that use pictures, photos, or icons can be very community-friendly. In many cases, it is appropriate to add written text to the picture or icon-based to-do lists. This depends on the strengths and needs of your student.
When to use a matching to-do list?
Consider some form of matching to-do list if the student is unable to decode and comprehend words independently on a written to-do list or does not decode pictures, icons, or photos consistently. Many individuals can “decode” words but some do not comprehend the meaning of the words; thus, written information alone would not be helpful to the individual and a matching to-do list would likely be more appropriate.
For more information on determining whether to use a matching system, click here.
Depending on the school or work environment, you can set up a matching to-do list: 1) For an individual who works at a stationary work table, or 2) For an individual who moves about the work place to complete his tasks. These will be described as a stationary vs. portable to-do lists. The way you set up the to-do list will depend on both the individual’s work style as well as the demands of the work place.
| General Guidelines: |
|
1. Determine what type of symbols to use, such as:
This decision should be based on the student’s previous experience / exposure to certain types of images. If the student is accustomed to using real photographs, then in most cases this is the most appropriate choice. It is important to ensure that the student is able to:
Additionally, it can be appropriate to incorporate strong interests into the matching cues when a person is motivated (but not distracted) by seeing those interests incorporated into his work. However, some individuals are motivated by visual matches, so simply matching numbers or colors is rewarding because they are confident that that are working correctly, or “getting it right.” 2. Determine how the symbols will be arranged and accessed by the student. Specifically, you can present the to-do list in a left-to-right (horizontal) presentation or a top-to-bottom (vertical) presentation. In some cases, you might present the to-do list in a flip book format, where each image is Velcroed to or inserted on each page of the book, and the student progresses from the beginning of the book to the end. |
Guidelines for arranging a stationary matching to-do list:
- Print out pictures or symbols on a piece of paper.
- Each picture or symbol should represent a different task. The pictures can be presented either vertically or horizontally in the order that they are to be completed.
- The student should complete the task represented in the first picture by matching the picture to a Velcroed picture in that space or to a container holding the task. A second option is to match the picture or photo to a pocket in that space or on a container holding the task.
- When tasks will change from day to day, it is best to laminate each picture or symbol as a separate card. Then the cards can be arranged on a Velcro strip at the beginning of a shift to address the order of activities needed for that day.
- Another option involves laminating the whole list of tasks on paper if the student or employee completes the same task on multiple days. Then the individual uses a dry erase marker to cross off each task as he completes it. That way, the same picture work system can be used across multiple shifts. However, be sure to develop several different versions / sequences of the to-do list to encourage variety and flexibility.
If the student uses the same exact sequence of activities each day, this may cause the student to become rigid about this sequence of tasks. It is important to promote flexibility because in school, vocational, and community settings, the student will need to adjust to the unexpected changes that naturally arise.
Example of a stationary matching to-do list:
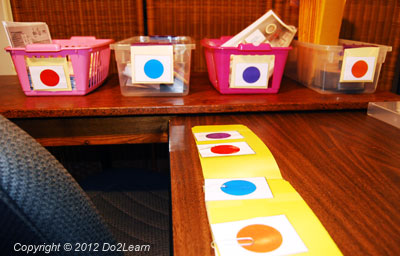
Here is an example of a matching work system that uses colors. The work system strip is placed on the middle desk, and indicates what the student will do, in this order: The purple task, red task, blue task, and orange task, and then check schedule. The tasks are laid out in bins on the left, and the finished box is on the right.
|
 |
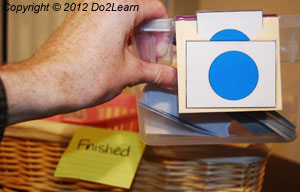 |
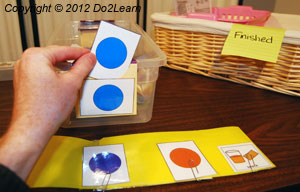
| The student takes the color card from the work system and matches it to the appropriate task. | He then completes the task and puts it in the finished area. | Once all the tasks are completed, the student takes his “What’s next?” cue, which in this case is a snack card, and carries the snack card to a break area. |
Summary:
What to do?
The tasks in bins lined up on the left hand side
How much to do?
Four
When are you finished?
When all of the tasks are in the finished area
What’s next?
The cue card indicates that a snack break is next
Guidelines for arranging a portable matching to-do list:
- Print and cut out picture cards for each activity. You can laminate the cards for durability or use heavy stock paper.
- The picture cards can be Velcroed or paper clipped to a sturdy surface (sturdy stock board, laminated paper, sturdy folder, white board, clip board, etc.).
- As another option, you might use a flip book format, where each image is Velcroed to or inserted on each page of the book, and the student progresses from the beginning of the book to the end.
- The student should take the first picture off and go do the task. The picture card can either be carried to the location of the task, where there is a place to put it (finished basket, for example), or there can be a finished basket on the right hand side of a specified work area. Or, if paperclips are used to secure the cards, the student can take the card off and turn it over.
- When the student is done with the task, he should go back to the picture card to-do list and get the card for the next task. Complete it and go through the same process.
- As the tasks are being completed, the picture cards disappear or are being turned over. This shows the student that he is making progress and getting closer to being finished.
Example of a portable matching to-do list:
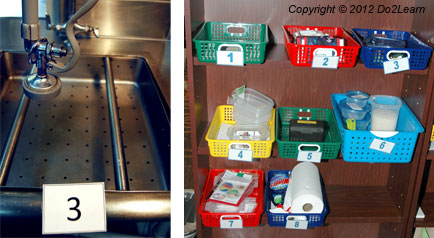
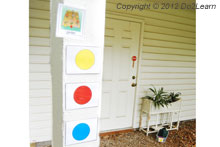
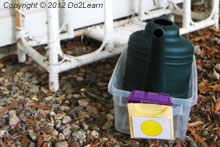
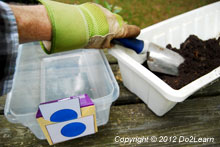
In this example, the schedule has directed the employee to work in the garden. The employee carries the garden cue from his schedule to the yard, and matches the garden visual cue into the pocket on top of his to-do list. The employee then sees he is to do the yellow task, red task, and blue task, and then check his schedule.
 |
 |
 |
 |
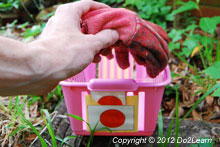
| He removes the yellow card from the to-do list, and finds the yellow bin in the yard. | He matches the yellow card to the bin and then completes that task. | He then returns to the to-do list, gets the next card which is red, finds the red bin, matches the color, and completes that task. | He does the same with the last task, the blue card. |
Summary:
What to do?
The tasks in bins (yellow task, red task, and blue task)
How much to do?
Three tasks
When are you finished?
When all of the cards are gone from the to-do list strip
What’s next?
At the end of the to-do list strip, is a check schedule card. Thus, when the student has completed all tasks, he will go check his schedule.
Example of a matching to-do list that incorporates the individual’s interests:
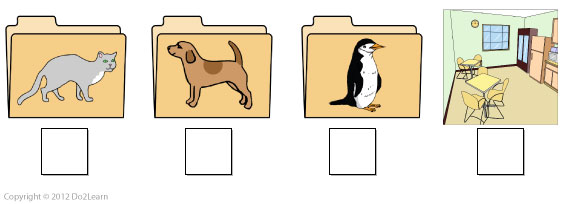
In this example, a young woman works in the library. She can read and comprehend simple words and phrases, but still struggled with following a basic to-do list with words and pictures. Her job coach decided to incorporate her strong interest in animals into her to-do list. Now, the employee is excited and motivated to complete the tasks in her to do list.
Summary:
What to do?
The tasks in the specified folders
How much to do?
Three tasks
When are you finished?
When all of the tasks are checked off
What’s next?
Whatever is written on the list after the work tasks are completed, in this case, break time.