
 Written to-do lists are just that – simple written lists of things to do.
Almost everyone makes lists at some point, and this simple strategy can be extremely helpful to someone in regular and special education classrooms, vocational, home-based, and leisure contexts. A written to-do list is an organizational system that appears very commonplace and ordinary, as many people use them.
The primary difference between the list you keep in your pocket and the to-do list for someone is that the latter answers the essential 4 questions:

In addition to using simply a written to-do list, adding pictures to the list, or using bins and folders should be considered for many students . Adding pictures provides additional clarity and ease of use. Using folders and/or bins provides additional structure and organization for a student . Each of these ways to use a written to-do list are described in the section below.
Following a list is one skill. Creating a written to-do list for oneself is significantly more complex yet within the capacity of some students . It requires skills of problem solving, prioritizing and estimating time needed for specific tasks. Since the instructor’s goal is to support student success in using the strategy, care should be taken in teaching a student to independently create and follow his own to-do list.
When to use written to-do lists versus other formats?
Use written to-do lists if the student can decode and comprehend written text. A written list could be in the form of sentences, phrases, or single words depending on the student’s reading level and the level of specificity required to communicate the task.
For more information about how to decide whether a written to-do list is most appropriate for your student, click here.
Guidelines for creating a written to-do list:
- Write each task the student is to complete on a separate line on the list, or guide the student in drafting this list.
 The list may be kept on the left hand side of the student’s work area or hanging on a clipboard on the wall in front of the student in the work area. In some cases, it might be appropriate to use an electronic list that is housed in the student / employee’s hand-held device. Other students might benefit from keeping their to-do lists in their student agendas / day planners.
In many cases, the list is kept to the student’s left because when we visuo-spatially orient ourselves to a starting point in activities, we often orient to a left-side starting point (e.g. reading from left to right; dirty dishes in sink on left, clean dishes in drying rack on right).
The to-do list is always kept in a routine and consistent space so that the student can refer to it during activities.
- The student completes the first task written on the list by collecting it and completing it in the appropriate work space.
- Then, the student puts the finished task or materials in a designated finished area on the right hand side, or in another specified location.
In many cases, the completed task is placed to the student’s right because when we visuo-spatially orient ourselves to an ending point, we often orient to a right-side ending point (e.g. reading from left to right).
- The student marks off the completed task on the list by crossing it off or putting a checkmark beside it. A student might check or cross the task off as he collects the task, prior to completing it in the designated work space. For some, this is the better approach because when the student comes back to the list, he understands what is next because it has not yet been crossed off.
For other individuals, they might mark off the task upon completion of that task. This depends on the learning style and preferences of the student, the environment in which he is working, and the nature of the tasks.
Either way, it is very important that the student see that he is making progress through the crossing off of items. This is satisfying and inherently reinforcing for anyone. - The student completes the next task on the list and goes through this system until all tasks are completed.
- Finally, the student knows what happens after all of the tasks are completed because it is always indicated at the end of his to-do list. It might read “check your schedule,” “take a computer break,” “go ask Mr. Lions,” “Raise your hand,” “Clock out,” etc.
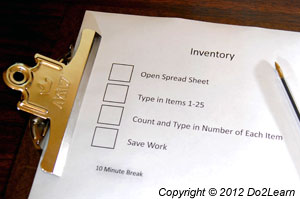
Example #1 of a written to-do list:
A student or teacher may write the following items on the student’s to do list:

The student completes each task in the order that they are written on his list and puts the finished materials and paperwork in the designated finished space. He crosses off each item as they are completed. That way, he can see the progress he is making as he is working. After completing his list, he turns the work in to Ms. Tunney. Then, he knows he can take a break and read quietly for the remainder of the class period.
This information helps to reduce or eliminate any anxiety he might feel about what is happening next, and the information prevents him from sitting idle, waiting for someone to tell him what to do next.
Summary:
- “What to do?”
The tasks written on the list - “How much to do?”
Four tasks - “When am I finished?”
When all of the tasks are marked off on the list - “What’s next?”
Whatever is written on the list. The list should tell the student what to do next. In the example above, the student is to read magazines at his desk when all of this work is complete.
Example #2 of a written to-do list:
A student is researching summer jobs or volunteer work. His teacher helps him devise a written to-do list:
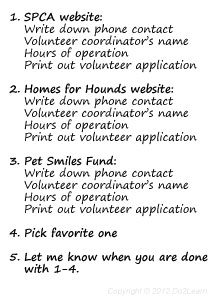
Summary
- What to do?
The tasks written on the to-do list - How much to do?
There are 4 main tasks here, with some specific information on how to complete the tasks - When am I finished?
When all of the items are marked off - What’s next?
The student needs to let his teacher know when he is done.
Adding pictures to the written list:
The size of the picture, photo, or icon is dependent on the needs and abilities of the student. In many cases, the icon can be quite small and off to the side of the written word if the student just needs occasional support in working independently.

For another student, the icon can be large with a smaller word under it if the student “decodes and comprehends” the icon more readily that the word.

- Some individuals benefit from an actual photograph of the activity or area that has been taken with a digital camera and printed out. Other realistic photos can be found using such search engines as Google Images.
- For other individuals, icons make more sense than photographs. Icons can be obtained via the View2do program.
- For some individuals, a simple hand-drawn picture is enough. Using drawings and quick sketches is sometimes the most practical and time-efficient approach.
Example of a written to-do list that incorporates pictures:
A student is working in the school cafeteria as part of his vocational training. Although he can decode text, he references icons more quickly and easily than written information. Thus, both written information and pictures are included on his to-do list.
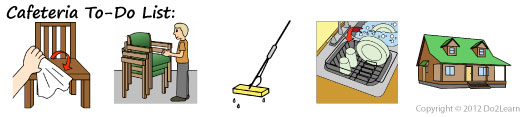
Summary:
- “What to do?”
The tasks listed (wipe tables, put chairs on top of tables, mop floor, put cleaning supplies away) - “How much do I have to do?”
Four tasks - “When am I finished?”
When all the items are marked off - “What’s next?”
In this example, the student goes home after his to-do list is complete
Using folders and/or bins in combination with written to-do lists:
How to use folders and/or bins: 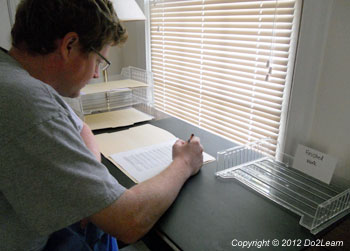
- Separate each task (e.g. worksheet, writing activity, etc.) into a different folder. Or, if the task has multiple materials or does not fit in a folder, use a bin.
- Organize the folders on a filing tray or other organizer on the student’s left hand side. If the tasks on the to-do list are electronically based, your folder system might be electronic in form as well. If you are using bins, line them up on the left-hand side of the table or a shelf next to the table.
- When the student looks to the left, he can easily see what needs to be completed. The number of folders/bins indicates the number of tasks he has to do.
- The student takes one folder or bin from their left hand side. He completes the task at his desk or designated work station.
- He then places the completed work in a finished tray.
- Or, if there is a natural “finished” place, such as filed away inside a filing cabinet, in a teacher’s classroom folder, or in his own 3-ring binder, he would put the finished materials there. The empty folder can be placed in the finished tray.
- A visual cue should be provided at the end of the tasks (bottom of the stack, bottom of empty bin) that reminds the student what to do next, such as check the schedule, take a break, or go to a different work area.
Example #1 of a written to-do list with folders:
A student has a number of assignments to complete in his World History class. His teacher devises a written to-do list, but also places each specific paper-based assignment (worksheet, vocabulary-building activity, and writing exercise) in a separate folder. The folders are placed on the student’s left hand side, and as he completes each assignment, he moves that folder to the right hand side of his desk.
Evan’s List:
_____ Complete “Ming Dynasty Key Questions” worksheet
_____ Complete vocabulary terms – 22 definitions
_____ Write one-paragraph response to daily question
_____ Turn in all three folders to me
_____ Chill out quietly
Summary:
- “What to do?”
The tasks written on the list. - “How much to do?”
Four. - “When am I finished?”
When all of the tasks are checked off on the list. - “What’s next?”
Whatever is written on the list. The list should tell the student what to do next. In the example above, the student will take a break when his work is complete.
Example #2 of a written to-do list with folders:
A school office assistant needs to complete a number of tasks. Each of the papers that accompany these tasks (the permission slips, the papers that need copying, and the papers that need filing) are contained in separate sections of an expandable file.
The student completes each task (A – G) one at a time, putting completed tasks in a designated finished area. Once all of the sections in the expandable file are empty, the student knows to check his schedule because that is indicated on his to-do list.
Summary:
- “What to do?”
The tasks presented in the folders on the student’s left hand side. - “How much do I have to do?
The number of folders on the student’s left hand side; in this scenario, there are three folders. - “When am I finished?”
When all of the folders on his left hand side are completed and in the finished tray on the right hand side. - “What’s next?”
The next activity on the student’s schedule. This can either be written somewhere (“check schedule”) on the empty tray, or it can be part of a routine; when the student is out of folders, he knows to check his schedule. In this case, he checks in with the school administrator.
Example of a written to-do list with electronic folders:
A computer programmer may include the following items on her to-do list:
- Build interface
- Program database #3
- Import all contact lists
- File new codes in database #3
- Check in with Larry
She completes each task in the order that they are indicated on her list and puts the finished document in an electronic folder in her computer. She crosses off each item as she starts that task and places each in the electronic “done” folder. That way, she can see the progress she is making as she is working. After completing her list, she asks Larry for the next task or list to complete.
Summary:
- “What to do?”
The tasks written on the list. - “How much to do?”
Four tasks. - “When am I finished?”
When all of the tasks are marked off on the list. - “What’s next?”
Whatever is written on the list. The list should tell the employee what to do next. In the example above, the employee is to ask Larry (their supervisor, co-worker, or perhaps job coach) what to do next.